Sharing Solar Arrays with Pumb and Inverter
How to Safely Share One Solar Array With Two Devices
So, you have a brilliant idea: you want to use a single set of solar panels to power both your 3.0 kWh hybrid inverter (for battery charging and home use) and a separate AC/DC water pump. This is a smart way to maximize the sun’s energy throughout the day. It’s absolutely possible to do, but it requires a specific and safe approach to avoid some serious—and expensive—problems.
Many people assume you can just split the wires and connect them to both devices at the same time. Unfortunately, this is the quickest way to damage your sensitive electronics. Think of it like this: you can’t have two people trying to drive the same car at once, both grabbing the steering wheel and hitting the pedals. It leads to chaos. The same principle applies here. Let's walk through the right way to get this done, step-by-step.
YouTube Video Suggestion:
Description: A clean, animated graphic showing a single solar array with arrows pointing to a water pump (for daytime use) and a home with batteries (for evening use).
ALT Text: Animated graphic illustrating a 4S solar array powering a pump and a hybrid inverter system safely.
Filename: solar-array-sharing-concept.jpg
1. The Main Idea: One at a Time
The secret to making this work is to ensure your four solar panels, connected in series (4S), only send their power to one device at a time. You are creating a single, powerful energy source, and you need to direct its flow. You can achieve this easily and safely by installing either a DC changeover switch or a 2-pole DC isolator switch.
Think of this switch as a railway track switcher. It directs the train (your solar power) down one track to the hybrid inverter or down another track to the pump controller. The key is that the power can never go down both tracks simultaneously. This simple component is the hero of our setup, preventing the two devices from ever interacting directly and causing damage. So, to be perfectly clear: sharing your 4S solar array is a definite yes, but connecting it directly to both devices at once is a costly no.
2. Why Connecting Directly Is So Dangerous
If you were to simply splice the solar panel wires and run them to both the inverter and the pump controller in parallel, you create an unstable and hazardous situation. The internal electronics of these devices are not designed to be connected to another power-drawing device on the same line.
Here’s what happens: the "brains" inside each unit, known as the MPPT controllers, will start fighting each other. Each one tries to find the best voltage to draw the most power, but since they're both pulling on the same source, they end up dragging the voltage up and down unpredictably. This can cause one device to send electricity back into the other (a dangerous event called backfeeding), which can fry the sensitive input circuits. You might see the pump controller flashing error codes like P30 or P70, hear your inverter beeping, or even smell the distinct scent of overheating electronics. In a worst-case scenario, the inverter's input stage can fail completely. A simple switch prevents all of this drama.
YouTube Video Suggestion:
Description: A short, animated clip
showing two MPPT controllers as cartoon characters tugging a power cable back and forth, causing sparks and error messages on an inverter and pump.
ALT Text: Animation showing the conflict between two MPPT controllers fighting over a single solar power source.
Filename: mppt-controller-conflict-explained.jpg
3. Basic Safe Wiring Diagram
The safest and most common way to wire this is by using a manual DC changeover switch. Below is a simplified diagram showing how the power flows from your panels, through the switch, and to the selected device.
Option A — Manual DC Changeover Switch
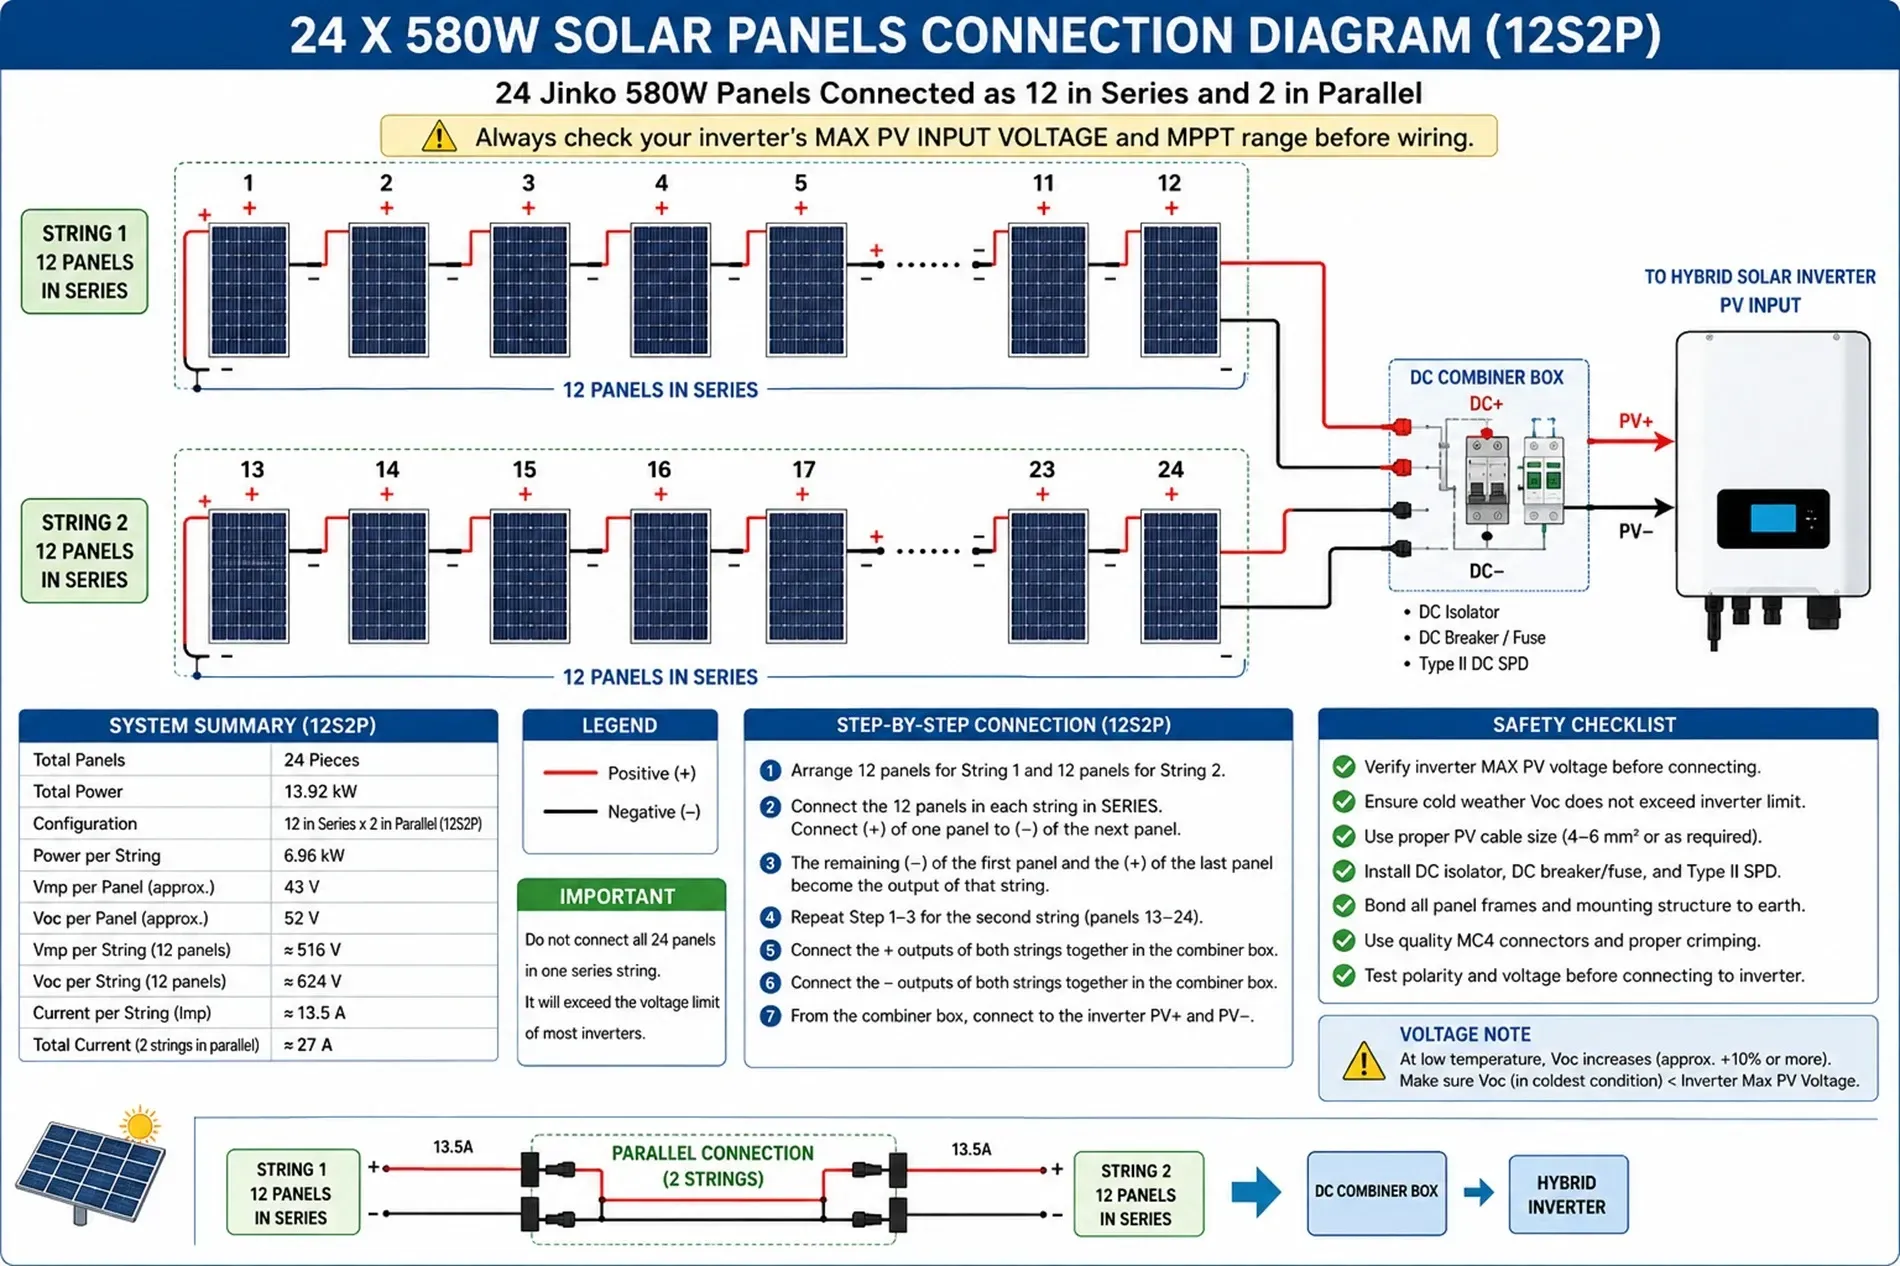
Your four solar panels are connected in series ("4S"):
Panel 1 (+) connects to Panel 2 (-)
Panel 2 (+) connects to Panel 3 (-)
Panel 3 (+) connects to Panel 4 (-)
This leaves you with one main positive (PV+) and one main negative (PV-) terminal for the whole array. Those two lines then run to your switch.
PV+ ------------------------------.
|
PV- ------------------------------|----> DC Isolator / DC Breaker
|
v
2-Pole DC Changeover Switch
/ \
/ \
v v
Hybrid Inverter PV+/- Pump Controller PV+/-
4. Arranging Your Panels for a 4S Layout
For the best performance, it's a good idea to arrange your panels to balance the total voltage, especially if they aren't perfectly identical. Let's assume you have two 710W panels and two 720W panels, each with similar voltage characteristics (around 48-49V open-circuit and 40-42V under load).
To create a balanced series string, you should alternate them. The best order would be:
710W → 720W → 710W → 720W
Here’s how you would physically connect them:
The negative (-) terminal of Panel 1 becomes your main PV- for the array.
Connect the positive (+) of Panel 1 to the negative (-) of Panel 2.
Connect the positive (+) of Panel 2 to the negative (-) of Panel 3.
Connect the positive (+) of Panel 3 to the negative (-) of Panel 4.
The positive (+) terminal of Panel 4 becomes your main PV+ for the array.
From there, your main PV+ and PV- lines will begin their journey to your equipment, starting with essential safety devices like a DC breaker and a surge protector before reaching the changeover switch.
5. The Complete and Recommended Wiring Order
For a system that is safe, protected, and easy to manage, your wiring should follow a specific order. Each component plays a vital role in protecting your investment from power surges, short circuits, and other electrical issues. Think of this as the gold standard for your installation.
The path of power should be:
4S Solar Array
↓
String Fuse / DC Breaker (Protects against overcurrent)
↓
DC Surge Protector (SPD) (Protects against lightning or grid surges)
↓
DC Isolator (Allows you to safely disconnect power for maintenance)
↓
2-pole DC Changeover Switch
├── Output A → Hybrid Inverter PV Input
└── Output B → AC/DC Pump Controller PV Input
Finally, proper grounding is not optional—it’s essential for safety. Make sure you have dedicated grounding wires connected to the metal frames of your solar panels, your combiner box or SPD, the inverter chassis, and the pump controller’s earth connection.
A clean schematic video that animates the flow of power from the panels, through the breaker, SPD, and changeover switch, highlighting each component.
6. Scenario 1: Pumping by Day, Charging by Night
Let’s imagine a typical use case. Your goal is to run your water pump during the peak sunny hours of the day to fill a tank, and then switch the solar array over to charge your batteries for the evening and night.
With the changeover switch installed, the process is simple and safe. In the morning, you walk over to your switch and flip it to the "Pump" position. Your solar array will now exclusively power the pump controller. Once your water tank is full or you're done pumping for the day, you simply flip the switch back to the "Inverter" position. The same solar panels will immediately start feeding power to your hybrid inverter to charge your batteries. This manual approach is the most affordable and reliable way to manage your system, giving you full control while ensuring there is never an electrical conflict.
7. Scenario 2: How a Direct Connection Fails
Now, let's look at what happens in the wrong setup. A homeowner decides to save on a switch and instead uses a junction box to split the wires from the 4S array, sending a set to both the inverter's PV input and the pump controller's PV input.
As soon as the sun comes up, chaos begins. The inverter’s MPPT starts searching for the optimal voltage to begin charging. At the same time, the pump controller tries to draw a huge surge of current to start the pump's motor, which drastically drags down the array's voltage. The inverter sees this sudden voltage drop and resets. The pump fails to get a stable voltage and either shuts down or throws an error code. You would witness the PV voltage fluctuating wildly, your devices beeping in protest, and no stable power being delivered to either one. This setup simply does not work and puts both devices at risk of failure from the constant electrical stress.
8. Scenario 3: How a Pump Surge Can Damage an Inverter
Here’s another incorrect approach we’ve seen people consider: using the inverter’s AC output to power the pump controller, while both are also sharing the same DC solar source. This creates a dangerous feedback loop.
When the pump controller tries to start, its motor creates a massive power surge (inrush current) on the AC side. This surge travels right back into your small 3.0 kWh inverter. The inverter isn't designed to handle such an abrupt, powerful load from another power controller; it expects to run normal appliances. It will likely see this surge as a dead short, causing it to trip its internal breakers or, in a worst-case scenario, burn out its output stage. The solution is to always keep the power paths completely separate: the solar DC path and the pump's AC power path should never be mixed in this way.
A split-screen video. On the left, a homeowner easily flips a switch ("Correct Way"). On the right, sparking wires and devices with error codes ("Incorrect Way").
9. Your Best Practice Options
You have a few excellent choices for setting up your system, ranging from simple and manual to fully automated. Your choice will depend on your budget and how much hands-on management you prefer.
Option 1 — Manual DC Changeover: This is the cheapest, simplest, and most reliable method we've discussed. It's perfect if you are on-site and can easily flip the switch when you need to change from pumping water to charging batteries.
Option 2 — Automatic Priority Controller: For those who want a "set it and forget it" system, you can use automatic relays or contactors. You could set up a system where, for example, the solar power is sent to the pump controller by default. When a float switch in your water tank signals that it's full, a relay automatically redirects the solar power over to the hybrid inverter. This requires more complex wiring and control logic and should be designed by someone with experience.
Option 3 — Separate Solar Arrays: If your budget and roof space allow, the best technical solution is to avoid sharing altogether. You could dedicate two or three panels just for the pump and a separate array of panels just for the inverter. This completely eliminates any potential for conflict and allows both systems to operate at peak efficiency all day long.
10. CRITICAL: The Final Voltage Check
Before you connect a single wire, you must perform this final, critical safety check. Not all inverters and pump controllers can handle the same amount of voltage. A "4S" array of your specific panels will produce a voltage that might be too high for one of your devices.
First, calculate your array’s maximum voltage, or Voc (Voltage at Open Circuit). This is the highest voltage the panels can produce in cold, sunny weather when they aren't connected to anything. With your panels at around 48-49 Voc each:
49 Volts x 4 Panels = 196 Voc
Next, find the label on both your hybrid inverter and your pump controller and look for the "Maximum PV Input Voltage" or "Max DC Voltage." If either device has a maximum voltage rating that is lower than your array's 196V Voc, you absolutely cannot use this 4S configuration. Doing so will permanently damage the unit the moment you connect it. Always make sure both devices can comfortably handle the array's maximum possible voltage.
A close-up shot of a person pointing to the specification label on the side of a solar inverter, with the "Max PV Input Voltage" text highlighted.
11. Safe Diagram With All Labels
Here is a final visual representation of the complete, safe, and balanced system.
[710W]--[720W]--[710W]--[720W]
|
PV- PV+
\_________________________/
4S String
↓
[DC Breaker]
↓
[DC SPD]
↓
[DC Isolator]
↓
[2-Pole DC Changeover Switch]
/ \
/ \
Inverter Pump Controller
By following this layout, you ensure your system is protected, efficient, and will serve you well for years to come.
Feeling Confident? Or a Little Unsure?
If this guide makes perfect sense and you feel ready to tackle your project, that's fantastic! A well-planned DIY project can be incredibly rewarding. However, if you've read through this and feel that it’s more complex than you anticipated, that is perfectly normal. Working with DC electricity, especially at higher voltages, requires care and expertise. Your safety and the protection of your expensive equipment are the top priorities.
Don't hesitate to reach out to a professional. A certified solar installer can look at your specific equipment, design a bulletproof wiring plan, and ensure everything is installed according to the highest safety standards and local electrical codes. If you want peace of mind knowing the job is done right, our team is here to help. Contact us today for a free, no-obligation consultation to discuss your project.
A friendly, professional solar installer smiling and shaking hands with a happy homeowner in front of a neatly installed solar power system.
Before you begin, it’s always a wise step to check with your local municipal authority regarding permits or specific electrical code requirements for solar installations. Ensuring your project is compliant from the start can save you headaches later on."
.
How to Safely Share One Solar Array With Pump and Inverter
So, you have a brilliant idea: you want to use a single set of solar panels to power both your 3.0 kWh hybrid inverter (for battery charging and home use) and a separate AC/DC water pump. This is a smart way to maximize the sun’s energy throughout the day. It’s absolutely possible to do, but it requires a specific and safe approach to avoid some serious—and expensive—problems.
Many people assume you can just split the wires and connect them to both devices at the same time. Unfortunately, this is the quickest way to damage your sensitive electronics. Think of it like this: you can’t have two people trying to drive the same car at once, both grabbing the steering wheel and hitting the pedals. It leads to chaos. The same principle applies here. Let's walk through the right way to get this done, step-by-step.
A clean, animated graphic showing a single solar array with arrows pointing to a water pump (for daytime use) and a home with batteries (for evening use).
1. The Main Idea: One at a Time
The secret to making this work is to ensure your four solar panels, connected in series (4S), only send their power to one device at a time. You are creating a single, powerful energy source, and you need to direct its flow. You can achieve this easily and safely by installing either a DC changeover switch or a 2-pole DC isolator switch.
Think of this switch as a railway track switcher. It directs the train (your solar power) down one track to the hybrid inverter or down another track to the pump controller. The key is that the power can never go down both tracks simultaneously. This simple component is the hero of our setup, preventing the two devices from ever interacting directly and causing damage. So, to be perfectly clear: sharing your 4S solar array is a definite yes, but connecting it directly to both devices at once is a costly no.
2. Why Connecting Directly Is So Dangerous
If you were to simply splice the solar panel wires and run them to both the inverter and the pump controller in parallel, you create an unstable and hazardous situation. The internal electronics of these devices are not designed to be connected to another power-drawing device on the same line.
Here’s what happens: the "brains" inside each unit, known as the MPPT controllers, will start fighting each other. Each one tries to find the best voltage to draw the most power, but since they're both pulling on the same source, they end up dragging the voltage up and down unpredictably. This can cause one device to send electricity back into the other (a dangerous event called backfeeding), which can fry the sensitive input circuits. You might see the pump controller flashing error codes like P30 or P70, hear your inverter beeping, or even smell the distinct scent of overheating electronics. In a worst-case scenario, the inverter's input stage can fail completely. A simple switch prevents all of this drama.
A short, animated clip showing two MPPT controllers as cartoon characters tugging a power cable back and forth, causing sparks and error messages on an inverter and pump.
3. Basic Safe Wiring Diagram
The safest and most common way to wire this is by using a manual DC changeover switch. Below is a simplified diagram showing how the power flows from your panels, through the switch, and to the selected device.
Option A — Manual DC Changeover Switch
Your four solar panels are connected in series ("4S"):
Panel 1 (+) connects to Panel 2 (-)
Panel 2 (+) connects to Panel 3 (-)
Panel 3 (+) connects to Panel 4 (-)
This leaves you with one main positive (PV+) and one main negative (PV-) terminal for the whole array. Those two lines then run to your switch.
PV+ ------------------------------.
|
PV- ------------------------------|----> DC Isolator / DC Breaker
|
v
2-Pole DC Changeover Switch
/ \
/ \
v v
Hybrid Inverter PV+/- Pump Controller PV+/-
4. Arranging Your Panels for a 4S Layout
For the best performance, it's a good idea to arrange your panels to balance the total voltage, especially if they aren't perfectly identical. Let's assume you have two 710W panels and two 720W panels, each with similar voltage characteristics (around 48-49V open-circuit and 40-42V under load).
To create a balanced series string, you should alternate them. The best order would be:
710W → 720W → 710W → 720W
Here’s how you would physically connect them:
The negative (-) terminal of Panel 1 becomes your main PV- for the array.
Connect the positive (+) of Panel 1 to the negative (-) of Panel 2.
Connect the positive (+) of Panel 2 to the negative (-) of Panel 3.
Connect the positive (+) of Panel 3 to the negative (-) of Panel 4.
The positive (+) terminal of Panel 4 becomes your main PV+ for the array.
From there, your main PV+ and PV- lines will begin their journey to your equipment, starting with essential safety devices like a DC breaker and a surge protector before reaching the changeover switch.
5. The Complete and Recommended Wiring Order
For a system that is safe, protected, and easy to manage, your wiring should follow a specific order. Each component plays a vital role in protecting your investment from power surges, short circuits, and other electrical issues. Think of this as the gold standard for your installation.
The path of power should be:
4S Solar Array
↓
String Fuse / DC Breaker (Protects against overcurrent)
↓
DC Surge Protector (SPD) (Protects against lightning or grid surges)
↓
DC Isolator (Allows you to safely disconnect power for maintenance)
↓
2-pole DC Changeover Switch
├── Output A → Hybrid Inverter PV Input
└── Output B → AC/DC Pump Controller PV Input
Finally, proper grounding is not optional—it’s essential for safety. Make sure you have dedicated grounding wires connected to the metal frames of your solar panels, your combiner box or SPD, the inverter chassis, and the pump controller’s earth connection.
A clean schematic video that animates the flow of power from the panels, through the breaker, SPD, and changeover switch, highlighting each component.
6. Scenario 1: Pumping by Day, Charging by Night
Let’s imagine a typical use case. Your goal is to run your water pump during the peak sunny hours of the day to fill a tank, and then switch the solar array over to charge your batteries for the evening and night.
With the changeover switch installed, the process is simple and safe. In the morning, you walk over to your switch and flip it to the "Pump" position. Your solar array will now exclusively power the pump controller. Once your water tank is full or you're done pumping for the day, you simply flip the switch back to the "Inverter" position. The same solar panels will immediately start feeding power to your hybrid inverter to charge your batteries. This manual approach is the most affordable and reliable way to manage your system, giving you full control while ensuring there is never an electrical conflict.
7. Scenario 2: How a Direct Connection Fails
Now, let's look at what happens in the wrong setup. A homeowner decides to save on a switch and instead uses a junction box to split the wires from the 4S array, sending a set to both the inverter's PV input and the pump controller's PV input.
As soon as the sun comes up, chaos begins. The inverter’s MPPT starts searching for the optimal voltage to begin charging. At the same time, the pump controller tries to draw a huge surge of current to start the pump's motor, which drastically drags down the array's voltage. The inverter sees this sudden voltage drop and resets. The pump fails to get a stable voltage and either shuts down or throws an error code. You would witness the PV voltage fluctuating wildly, your devices beeping in protest, and no stable power being delivered to either one. This setup simply does not work and puts both devices at risk of failure from the constant electrical stress.
8. Scenario 3: How a Pump Surge Can Damage an Inverter
Here’s another incorrect approach we’ve seen people consider: using the inverter’s AC output to power the pump controller, while both are also sharing the same DC solar source. This creates a dangerous feedback loop.
When the pump controller tries to start, its motor creates a massive power surge (inrush current) on the AC side. This surge travels right back into your small 3.0 kWh inverter. The inverter isn't designed to handle such an abrupt, powerful load from another power controller; it expects to run normal appliances. It will likely see this surge as a dead short, causing it to trip its internal breakers or, in a worst-case scenario, burn out its output stage. The solution is to always keep the power paths completely separate: the solar DC path and the pump's AC power path should never be mixed in this way.
YouTube Video Suggestion (for sections 6, 7, 8):
Description: A split-screen video. On the left, a homeowner easily flips a switch ("Correct Way"). On the right, sparking wires and devices with error codes ("Incorrect Way").
ALT Text: Video comparing the correct, safe way to share solar panels versus the incorrect, dangerous way.
Filename: solar-wiring-dos-and-donts.jpg
9. Your Best Practice Options
You have a few excellent choices for setting up your system, ranging from simple and manual to fully automated. Your choice will depend on your budget and how much hands-on management you prefer.
Option 1 — Manual DC Changeover: This is the cheapest, simplest, and most reliable method we've discussed. It's perfect if you are on-site and can easily flip the switch when you need to change from pumping water to charging batteries.
Option 2 — Automatic Priority Controller: For those who want a "set it and forget it" system, you can use automatic relays or contactors. You could set up a system where, for example, the solar power is sent to the pump controller by default. When a float switch in your water tank signals that it's full, a relay automatically redirects the solar power over to the hybrid inverter. This requires more complex wiring and control logic and should be designed by someone with experience.
Option 3 — Separate Solar Arrays: If your budget and roof space allow, the best technical solution is to avoid sharing altogether. You could dedicate two or three panels just for the pump and a separate array of panels just for the inverter. This completely eliminates any potential for conflict and allows both systems to operate at peak efficiency all day long.
10. CRITICAL: The Final Voltage Check
Before you connect a single wire, you must perform this final, critical safety check. Not all inverters and pump controllers can handle the same amount of voltage. A "4S" array of your specific panels will produce a voltage that might be too high for one of your devices.
First, calculate your array’s maximum voltage, or Voc (Voltage at Open Circuit). This is the highest voltage the panels can produce in cold, sunny weather when they aren't connected to anything. With your panels at around 48-49 Voc each:
49 Volts x 4 Panels = 196 Voc
Next, find the label on both your hybrid inverter and your pump controller and look for the "Maximum PV Input Voltage" or "Max DC Voltage." If either device has a maximum voltage rating that is lower than your array's 196V Voc, you absolutely cannot use this 4S configuration. Doing so will permanently damage the unit the moment you connect it. Always make sure both devices can comfortably handle the array's maximum possible voltage.
YouTube Video Suggestion:
Description: A close-up shot of a person pointing to the specification label on the side of a solar inverter, with the "Max PV Input Voltage" text highlighted.
ALT Text: A photo of a solar inverter's specification label, emphasizing the maximum PV input voltage rating.
Filename: checking-solar-inverter-voltage-specs.jpg
11. Safe Diagram With All Labels
Here is a final visual representation of the complete, safe, and balanced system.
[710W]--[720W]--[710W]--[720W]
|
PV- PV+
\_________________________/
4S String
↓
[DC Breaker]
↓
[DC SPD]
↓
[DC Isolator]
↓
[2-Pole DC Changeover Switch]
/ \
/ \
Inverter Pump Controller
By following this layout, you ensure your system is protected, efficient, and will serve you well for years to come.
Feeling Confident? Or a Little Unsure?
If this guide makes perfect sense and you feel ready to tackle your project, that's fantastic! A well-planned DIY project can be incredibly rewarding. However, if you've read through this and feel that it’s more complex than you anticipated, that is perfectly normal. Working with DC electricity, especially at higher voltages, requires care and expertise. Your safety and the protection of your expensive equipment are the top priorities.
Don't hesitate to reach out to a professional. A certified solar installer can look at your specific equipment, design a bulletproof wiring plan, and ensure everything is installed according to the highest safety standards and local electrical codes. If you want peace of mind knowing the job is done right, our team is here to help. Contact us today for a free, no-obligation consultation to discuss your project.
"Before you begin, it’s always a wise step to check with your local municipal authority regarding permits or specific electrical code requirements for solar installations. Ensuring your project is compliant from the start can save you headaches later on."

The body content of your post goes here. To edit this text, click on it and delete this default text and start typing your own or paste your own from a different source.